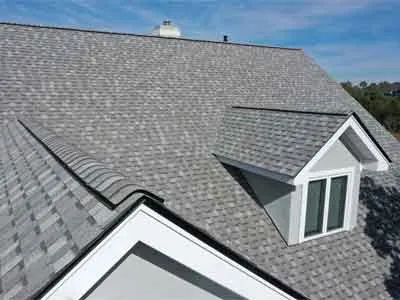
Dormer flashing seals the several joints where a dormer meets the main roof: the sidewalls (cheeks), the front apron below the window and the valleys on either side above it. Repair means correcting failed metal and sealant at those joints. It is a multi-part job within professional roof flashing repair.
What dormer flashing repair involves
A dormer is like a small building on the roof. Water runs down its roof into valleys on each side, down its cheek walls and onto the main roof, and it hits the dormer front below the window. Each of those paths needs its own flashing: valley metal at the top, step flashing along the cheeks and an apron across the front.
Because so many joints meet at each corner, dormers leak more often than flat roof sections. Common problems include missing step flashing at the cheeks, rusted valleys, nail penetrations and sealant doing the work of metal. Repair may involve opening the siding at the cheek walls and lifting the surrounding shingles to re-install the flashing in sequence. Related details include valley flashing repair and roof wall flashing repair.
Common problems this repair solves
- Rusted valleys on either side of the dormer
- Cheek-wall step flashing missing or corroded
- Front apron sealed with caulk instead of lapped metal
- Window trim and siding sealed over the flashing
- Debris dams in the small valleys behind the dormer
Signs you may need dormer flashing repair
- Stains on the ceiling below the dormer window
- Water at the window sill or trim
- Rotted trim or siding at the dormer corners
- Rust streaks on the dormer walls
- Leaks after wind-driven rain
How the repair process works
- Survey the joints. The provider checks each flashing area: front apron, cheek walls and the two valleys.
- Open the details. Siding, trim and nearby shingles are lifted so the flashing can be examined and replaced.
- Install in sequence. Flashing is installed from the lowest point upward so each piece laps the one below it.
- Re-seal the window and walls. Trim and wall coverings are re-set, and the dormer is checked for water entry.
What a good repair achieves
- Protects the dormer window and walls
- Keeps water out of the attic space behind the dormer
- Resolves a complex joint area in one visit
Anatomy of a dormer: five flashing zones
- Front apron: runs across the bottom of the dormer's front wall, over the shingles below
- Cheek-wall step flashing: stepped pieces along each side wall, woven into the shingle courses
- Valleys: the two channels where the dormer roof meets the main roof, uphill of the cheeks
- Roof-to-wall transitions at the window: wall cladding and trim must overlap the metal, not seal against it
- Ridge or upper junction: where the dormer roof ends against the main roof, often forming a small cricket
A leak at any of these will show up near the dormer, but not necessarily right under the failure. Describing where the stain appears relative to the dormer window helps the roofer narrow things down.
Window leak or roof leak? Why dormers get misdiagnosed
Dormer windows are often blamed for leaks that actually come from the surrounding flashing. A drip at the top corner of the window may be water entering at the cheek wall and following the framing, not the window seal. Water at the sill may come from the front apron, not the window itself.
Before replacing a window or recaulking it, ask the roofer to check the dormer's flashing and wall cladding first. Many dormer leaks are fixed without touching the window, saving money and avoiding disruption.
Repair or rebuild the dormer's flashing?
If only one cheek wall is corroded, a targeted repair may be enough. If the valleys and apron are also near the end of their life, rebuilding all of the flashing at once is usually better value than paying for repeated access to the same dormer. Ask the roofer to price both options so you can compare.
Also ask about the wall cladding and trim: after flashing is replaced, someone has to put the siding, stucco or trim back correctly. Confirm that is included, and that the finish will be sealed in a way that lets water drain, not trapped. For long valley lines behind the dormer, see valley flashing repair.
Dormer Flashing Repair in Folsom: local considerations
Dormers are common on two-story and upper-floor designs across Folsom, from older streets in Central District to newer subdivisions in Empire Ranch. Because each dormer has multiple joints, a leak at one corner can hide a second failure nearby.
If the leak involves the valley more than the walls, see our valley repair page. Everything else is on the Folsom roof flashing repair homepage.
Cost considerations
Dormer flashing repair cost depends on the dormer size, the number of dormers, wall cladding and whether trim or window repair is needed. A single corner repair is limited; rebuilding all dormer flashing is more involved. Prices vary by job.
Ask for each joint to be named in the quote so you know what is being repaired.
When to call a professional
Call a professional because dormer joints involve working beside windows and walls at height. DIY caulking often hides the leak path while the framing stays wet.
Dormer Flashing Repair FAQs
Why do dormers leak so often?
They have many joints where valleys, walls and aprons meet, so there are more places for flashing to fail.
Can I fix one dormer corner only?
Sometimes, but providers often check all corners, as a failure on one side often means others are aging.
Does dormer flashing include the window?
The window has its own sealing. Flashing handles the roof-to-wall joints around it.